Hi.
Im Afzal. I work as a drafter for more than 3 years now. I want to help those who are
new to Autocad and need to use it in their line of work. I would not
teach u from A-Z here. But I will teach you some important command
and what you should know when starting to work using Autocad. Here is
the list of the things that I think you should know:
- New drawing
- Layers
- Line and Polyline
- Linetype and Lineweight
- Object Snap
- Properties
- Viewport and Layout
If
you have anything to ask, feel free to reach me at:
- gmail : muhamadafzal92@gmail.com
- blogger : afzalmazlan.blogspot.com
To
create new drawing:
> click icon at the
top left of your screen as shown below or

small white
paper with tiny fold on its top right symbol
> click file >
select new or
> press ctrl+n
> select acadlt
(default)

There are
many type of template to be used, but for now just take the default
file.
To open layer properties:
> click layer
properties ribbon or
> type LA
> press enter

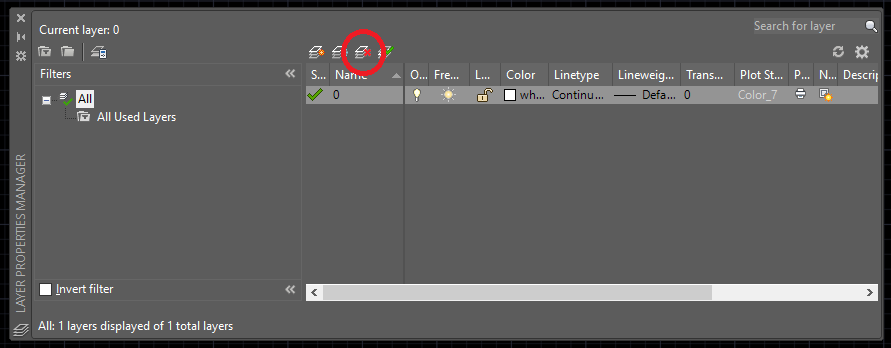
This is
layer properties window. Here, you can change everything about the
layer, from its colour, linetype and lineweight. You can also turn
on/off and freeze/unfreeze the layer here.
To create new layer:
> click the icon ( 3
layer of paper with small orange spark symbol ) or
> press alt+n
> rename the layer

3 layer of
paper with small orange spark symbol
To
change current layer:
> at the layer
properties, select the desired layer
> press the icon ( 3
layer of paper with small green tick symbol ) or
> press alt+c

3 layer of
paper with small green tick symbol.
To delete layer:
> at the layer
properties, select the desired layer
> press the icon ( 3
layer of paper with small red cross symbol ) or
> press alt+d
3 layer of
paper with small red cross symbol
*Additional
tips:
- Click the bulb icon to turn on/off the layer. Off layer will not be shown in the drawing.
- Click the sun icon to freeze the layer, and click the snow icon to unfreeze the layer. Freeze layer will force the layer to disappeared even if the layer is in block or Xref.
- Click the lock icon to lock/unlock the layer. Lock the layer so that you wont accidentally edit other objects.
To create Line:
> type L > press
enter
> click 1st
point > click 2nd
point
> press enter to end /
click more to continue

If you notice
when using line, those lines are separated and you need to select all
of them if you want to delete them all. I prefer Polyline over Line,
so I will convert them all into Polyline. Easier to work with if u
ask why.
To
create Polyline:
>
type PL > enter
>
click 1st point >
click 2nd point
>
press enter to end / click more to continue

Polyline
is slightly different to normal line. Polyline is combined at the end
of the line making it as 1 object when selected. You can also make a
curve or arc at the end of the polyline.
To add curve/arc at the
end of the line:
> type PL > enter
> click 1st
point > click 2nd
point
> press A
> click 3rd
point
> press enter to end /
click more to continue

There are
many more function to play with polyline, but for most of the time
you will only be using at least straight line and arc.
To change back
to straight line:
> at the
3rd point, press L
> click the
4th point

To
convert Line into Polyline:
> type PE (
for polyline edit ) > enter
> press M (
for multiple lines ) > enter
> select
desired line > enter
> press Y (
yes to convert all of them into polyline ) > enter
> press J (
to join all of them into single polyline ) > enter
> type in
distance between polyline ( we don't want any distance so 0 ) >
enter

*Additional tips.
- When joining lines, make sure all the Z-axis value is 0 to ensure all drawing is on 2D plane ( X-axis and Y-axis only ).
- When joining polylines, make sure all elevation is 0.
- When joining lines or polylines, make sure all end points is connected to each other. To ensure each end is connected, use object snap.
Linetype
is the type of the line you are working on. Whether its continuous
line or dashed line. How you want to change it:
>
go to layer properties, make new layer, name it dashed line

>
select layer dashed line
>
click its line type, continuous (by default when you create new
layer)
>
if there is no dashed line loaded, click load

>
click linetype DASHED > ok > ok
>
make layer dashed line as current layer

Lineweight is used to
change the thickness of the object. But it is only visible when you
plot or plot preview the drawing.
So I always set it to
default in the layer properties, and by layer in the properties.
I rarely used lineweight
to change the thickness. Instead, I use global width.
Global width show the
thickness in the drawing. So it would save time, no need to check
it at plot preview every time. To change the lineweight and the
global width, simply change it at layer properties or at the
properties panel.

Match properties is very
useful to save time. Its like copy and paste the properties of the
selected object, and paste it into the desired object.
To match the properties:
> type MA
> select the source
object
> select the
destination object

Object Snap is really
useful when working. It provide accurate and tidy drawing.
To open Object Snap
setting:
> right-click the icon
at the bottom right of your screen as shown below
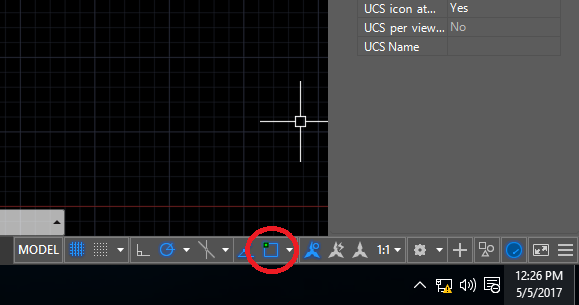
box with
small green square on its top left symbol
> select object snap
setting or
> type OS
> press enter

this is my
personal favorite object snap setting
You can tick
whichever suites you the most. Which will help you to work faster.
To on/off
object snap:
> press f3
to toggle on/off
The most important object snap for me is endpoints. It
will help to make sure each end of polyline is connected.

An
example of endpoint being used.
Noticed
the green square at the end of the line.

An
example of midpoint being used.
Noticed
the green triangle at the middle of the line.
To
open properties panel:
>
click modify tab
>
select properties

I
usually will lock the properties panel to the right of my screen. So
that I can see my working drawing and the properties of the object
I selected simultaneously. To do this, simply drag the properties
panel to the end of your right screen.
In
the properties panel, you can change the colour, linetype,
lineweight and more of the selected object. The properties will
change according to what type of object you select.
Note
that the properties here is for the object, not the layer. In layer
properties, you change the whole layer properties. But here, only
the object's properties will be changed.
Layout
is commonly used to differentiate working space and paper space.
Working space is in the model where all the drawings for example
road and drainage is. Paper space is where we put the title block
and all the details of the drawing. Viewport is used to view the
working space from the paper space.
To
create new layout:
>
click the plus symbol at the bottom left of the screen

>
select the layout you want to work on
>
there will be a viewport that had been created by default, so delete
that for now
>
click view tab > viewport > new viewport > ok or

> type VIEWPORT > enter > ok

>
click the 1st
corner
>
click the opposite corner (it will be a rectangular shape)

Example
of a rectangular viewport
to
edit the workspace from paperspace, double click inside the viewport.
To
get out of the viewport:
>
type PS > enter


No comments:
Post a Comment